ColourSpace can accurately profile and calibrate Boland monitors with 3D LUT capability.
- ColourSpace INF/XPT/PRO/CAL
- Manufacturer Specific ColourSpace Boland PRO/LTE
- Closed Loop Profiling
- 3D LUTs
- Inbuilt TPG Operation
All new Boland models with 3D LUT capability are ColourSpace Integrated.
ColourSpace Integration
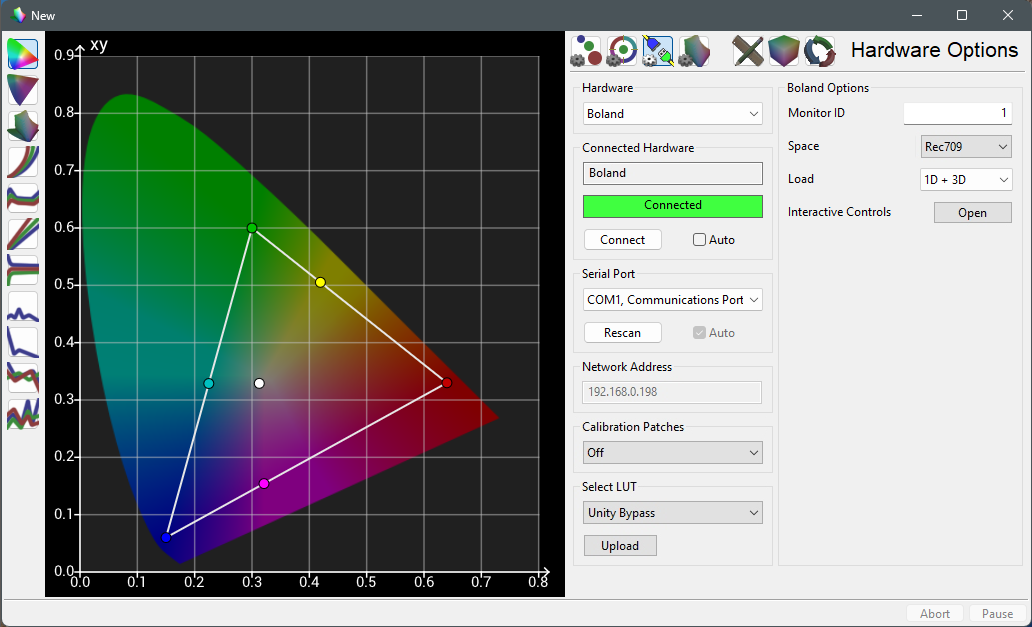
Boland calibration is controlled via the Hardware Options menu, accessed via the Profiling window.
Initial Setup
- If required, make sure the correct drivers are installed
(If necessary, verify via Windows Device Manager) - Connect the Boland monitor to the ColourSpace PC via a serial or network connection as required, as well as a direct video connection with valid signal, and start ColourSpace
- Set the desired ColourSpace set-up options via the Settings menu, as required
- Open a ColourSpace Profiling window, select Hardware Options, and select Boland from the Hardware drop-down list
- Either select the correct COMs port from the Serial Port drop-down, or select the Network Address window enter the required IP address, and select Connect
(If an IP address has been entered into the Network Address window it will be used by default) - Set the Monitor ID as required, matching the ID set within the monitor OSD
(Any Space slot can be user calibrated, and can be accessed via provided drop-down list, with the selected slot re-set when a Unity Bypass Upload is performed) - To make sure there is no existing calibration data active within the selected Profile/Load/LUT/Slot, and associated colour space selection, etc., select Unity Bypass from the Select LUT option, and press Upload
- Using Calibration Patches select the desired patch option to use for profiling
(If possible, Auto uses the patch settings defined within the ColourSpace Settings window, or else the closest available patch settings)
Note: The keyboard 'O' key can be used within the Manual Measure and Hardware menus to quickly Disable/Enable the TPG - Set the monitor's Peak Luma using the Interactive Controls while taking interactive measurements via the Manual Measure menu
(The desired target value will depend on the accuracy of the white point colour temperature)
Potentially, when Unity Bypass data is Uploaded all monitor settings will be nullified. Should it be desired that different LUTs and other settings remain as defined, upload the Default Unity LUT, which uploads just the LUT, and does not reset any additional settings. Set necessary settings, such as Brightness/Contrast/Black-Level, before any LUT Upload.
Profiling Operation
To profile the Boland monitor with ColourSpace navigate to the desired profiling mode - Manual Measure or Display Characterisation.
The screen of the Boland monitor will mimic the colour displayed, using the patch settings defined via the Hardware Options and Settings menus.
Profiling can then be performed as normal, using the probe connected to ColourSpace, and with the Boland screen displaying the required patches.
Alternatively, an external TPG can be used.
- Open a second ColourSpace Profiling window, select Hardware Options, and select the required TPG from the Hardware drop-down list
(Refer to the relevant TPG User Guide for further operational information) - The probe must be connected to the same Profiling Window as the TPG
Any patch generator can be used for SDR profiling, including direct HDMI/DVI/DisplayPort connection from the ColourSpace PC, with HDMI to SDI converter if required. For HDR/HLG/Dolby Vision, if applicable, correct metadata may be required within the video signal, requiring a dedicate TPG or metadata injector, unless the display can be manually forced into the required input format.
LUT Upload
After profiling, a Calibration LUT can be generated as normal within ColourSpace LUT Tools.
With the LUT still held within ColourSpace navigate back to the Hardware Options menu, and select the desired LUT from within the Select LUT options, and Upload.
Within Boland monitors there are three LUT slots, with the 1D + 3D combination being the normal configuration to use for display calibration, with the back 1D LUT left empty.
- 1D + 3D
- 1D1 (front)
- 3D
- 1D2 (back)
The back 1D LUT can be used to pre-set the monitor's greyscale and/or gamma as a first pass, and then the display can be re-profiled with the back 1D LUT active, and the 1D + 3D option used to uploaded final calibration LUTs generated from subsequent profiles made with the back 1D LUT active.
The front 1D LUT can also be generated independently from the 3D LUT, with both being uploaded separately, with the 1D LUT acting as an input, or shaper, LUT for the 3D LUT. As with any 1D +3D LUT combination, the 3D LUT has to be generated and uploaded first, and the display re-profiled with the 3D LUT active, to enable a 1D LUT to be generated and uploaded independently.
Calibration Guides
 3D LUT Calibration
Manual Calibration
3D LUT Calibration
Manual Calibration