ColourSpace ZRO - Recommended settings as starting pointColourSpace ZRO has an online interactive manual continuously updated (before each software release) for the users always to have up-to-date instructions.
However, I wanted to post a quick setting recommendation as a starting point for all users.
Settings 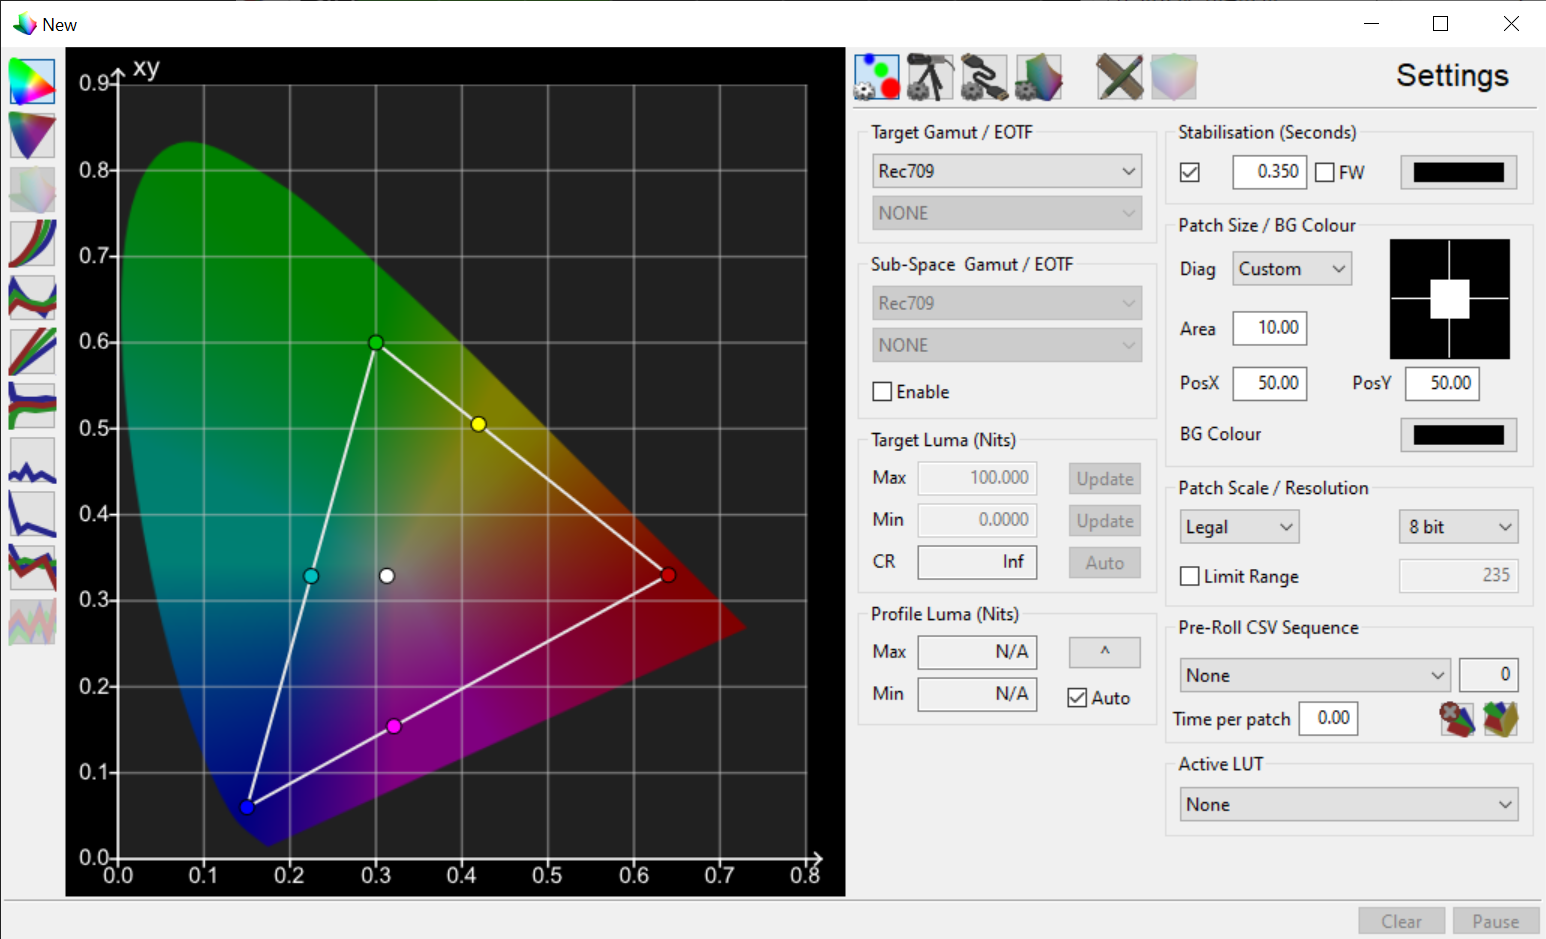
For SDR calibration, select REC.709 as Target colorspace, for software to use REC.709 primaries, REC.709 white point (D65), and 2.4 gamma for the color engine calculations and plotting the charts.
Stabilization of 0.350 sec is beneficial for OLED, Plasma, or CRT users. ColourSpace will display a black frame for 0.350 before displaying a regular pattern.
You can disable Stabilization with Projector, LCD, LED; it will not help with SDR calibration.
However, you can enable stabilization for HDR10 measurements of LCD/LED/OLED to help the panel thermally.
If you are using PGenerator, Area 10 will generate a 10% Window pattern; it's a good size as default for OLED/Plasma.
For Panasonic Plasma, use 6.5% area.
For Panasonic Plasma BT300, use 2% area.
For LCD without a dynamic backlight, 100% can be used.
For LCD/LED with local dimming, you can't disable it during calibration; you can use 50% area but change the background color to RGB 235.235.235 (100% White).
For Projector users, 10-18% area is OK.
Patchscale LEGAL if you perform manual calibration when TV/projector calibration controls work in legal video range (16-235).
Sony LCD/OLEDs TVs with Contrast 100 (which clips SuperWhite, the calibration controls work for Video Legal (16-235) while with Contrast 90 (allow Super-White) they work for Extended (16-255) range.
Profile Luma Auto, tick when you want from ColourSpace to continuously update the targets for black/white from these measurements.
You can untick during 2-Point RGB balance calibration since you will be interested just to fix RGB balance because 2-Point CalibrationCalibration can't fix gamma errors.
You can untick if you need specific nits also during your Peak White calibration and write with the keyboard your desired nit levels (max).
If you want to verify Calibration, keep Auto ticked the Profile Luma.
Generally, this setting, in most cases, needs to be ticked.
Use Patch resolution 8-bit since PGenerator can generate 8-bit patterns; Ted's patchlists have 8-bit triplets also.
Graph Options 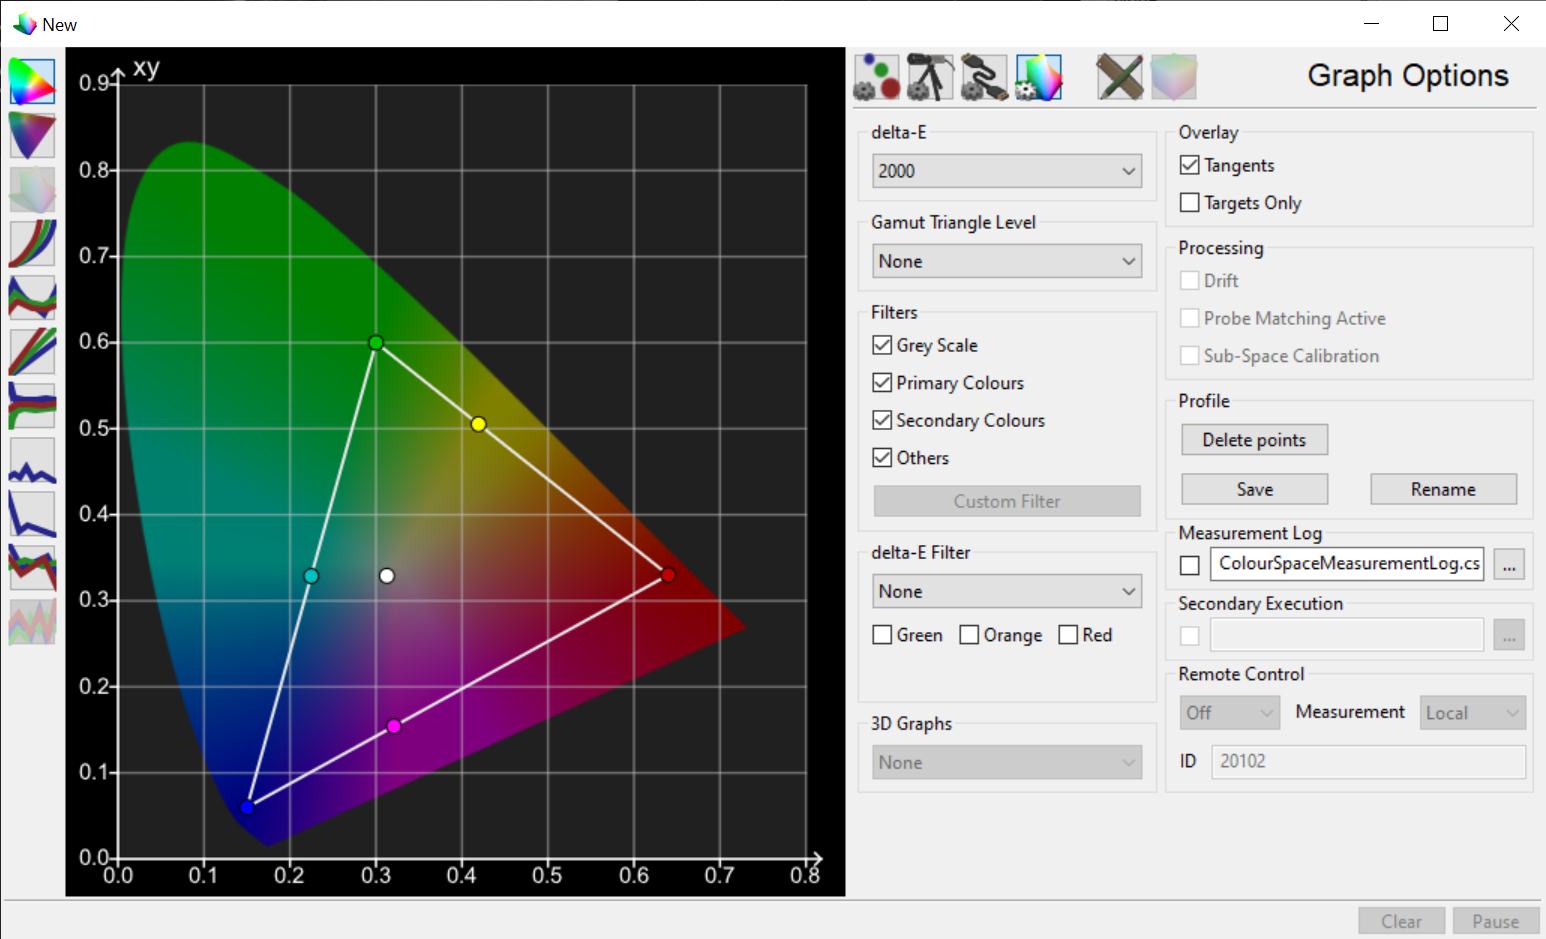
dE formula 2000 for SDR.
dE formula ITP for HDR (while it's not an industry-standard yet, you can use dE2000 also),
Tick all Filters to be able to see to the CIE charts all measurement points.
delta-E filter/radio buttons can be used to isolate dE presentation.
Overlay Tangents to show the distance of the measured point from the target point.
Probe Matching Active enabled if you are using meter profiling.
Hardware Options
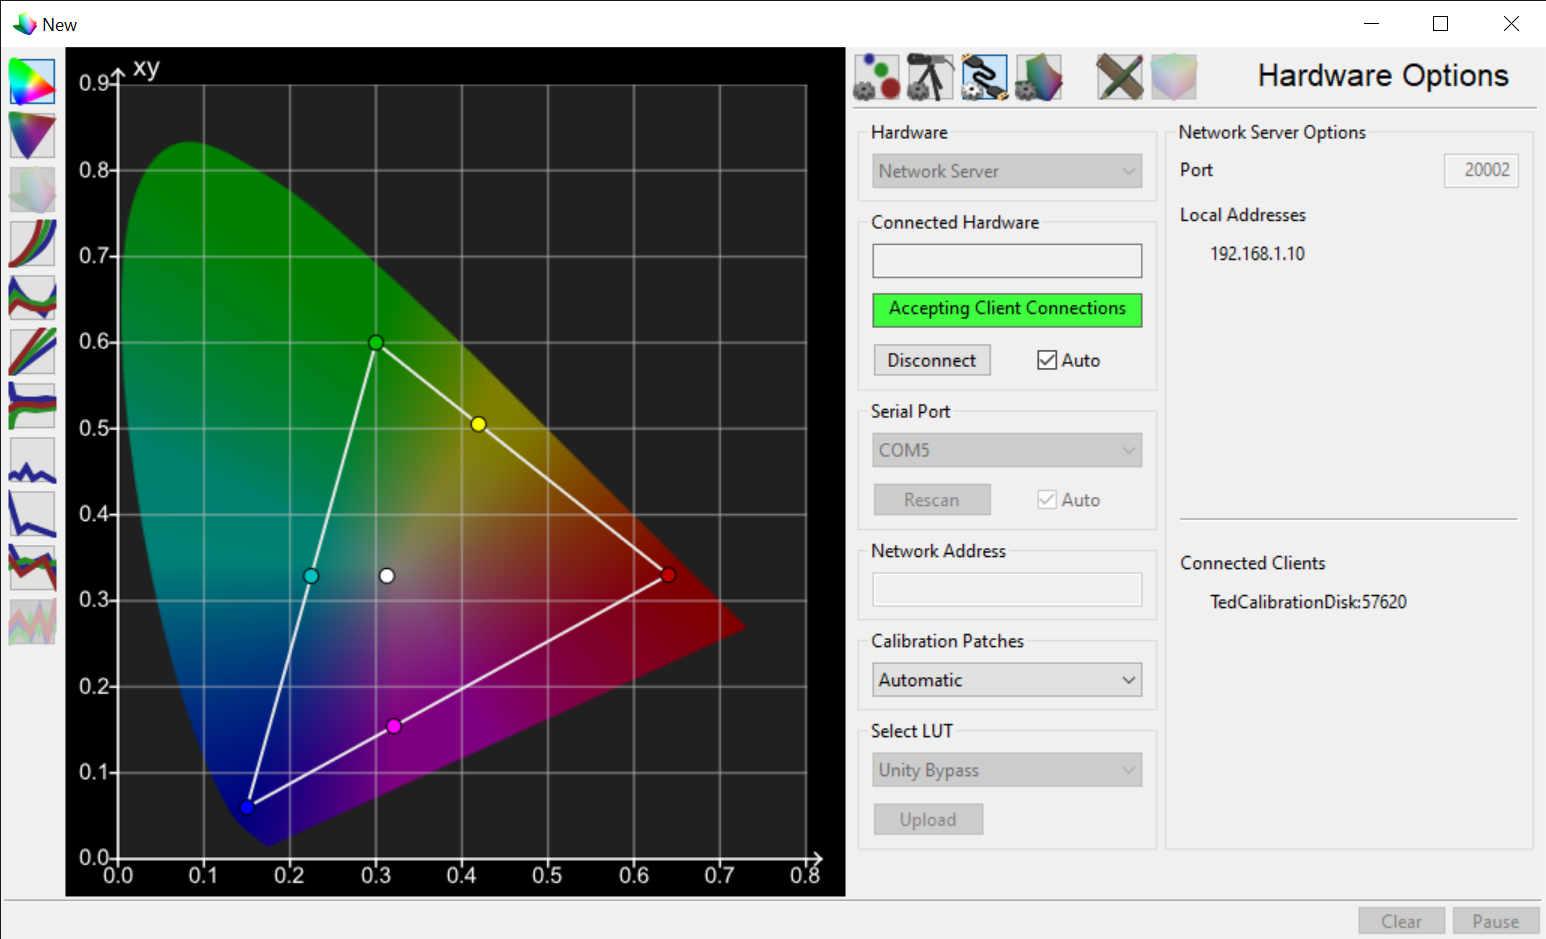
For PGenerator users, select Network Server, set calibration patches 'Automatic', and then you will see your PGenerator in the 'Connected Client' area.
Users of Ted's Calibration Disk without PGenerator, can ignore this screen.
Manual MeasureFor Ted's calibration disk users, they can load the provided patchlists:
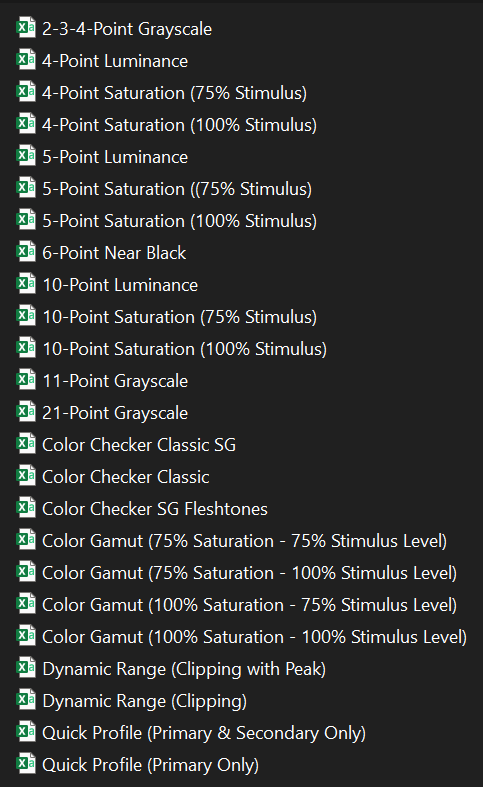
After loading a patchlist, for example the 11-Point Grayscale, it will look like this:
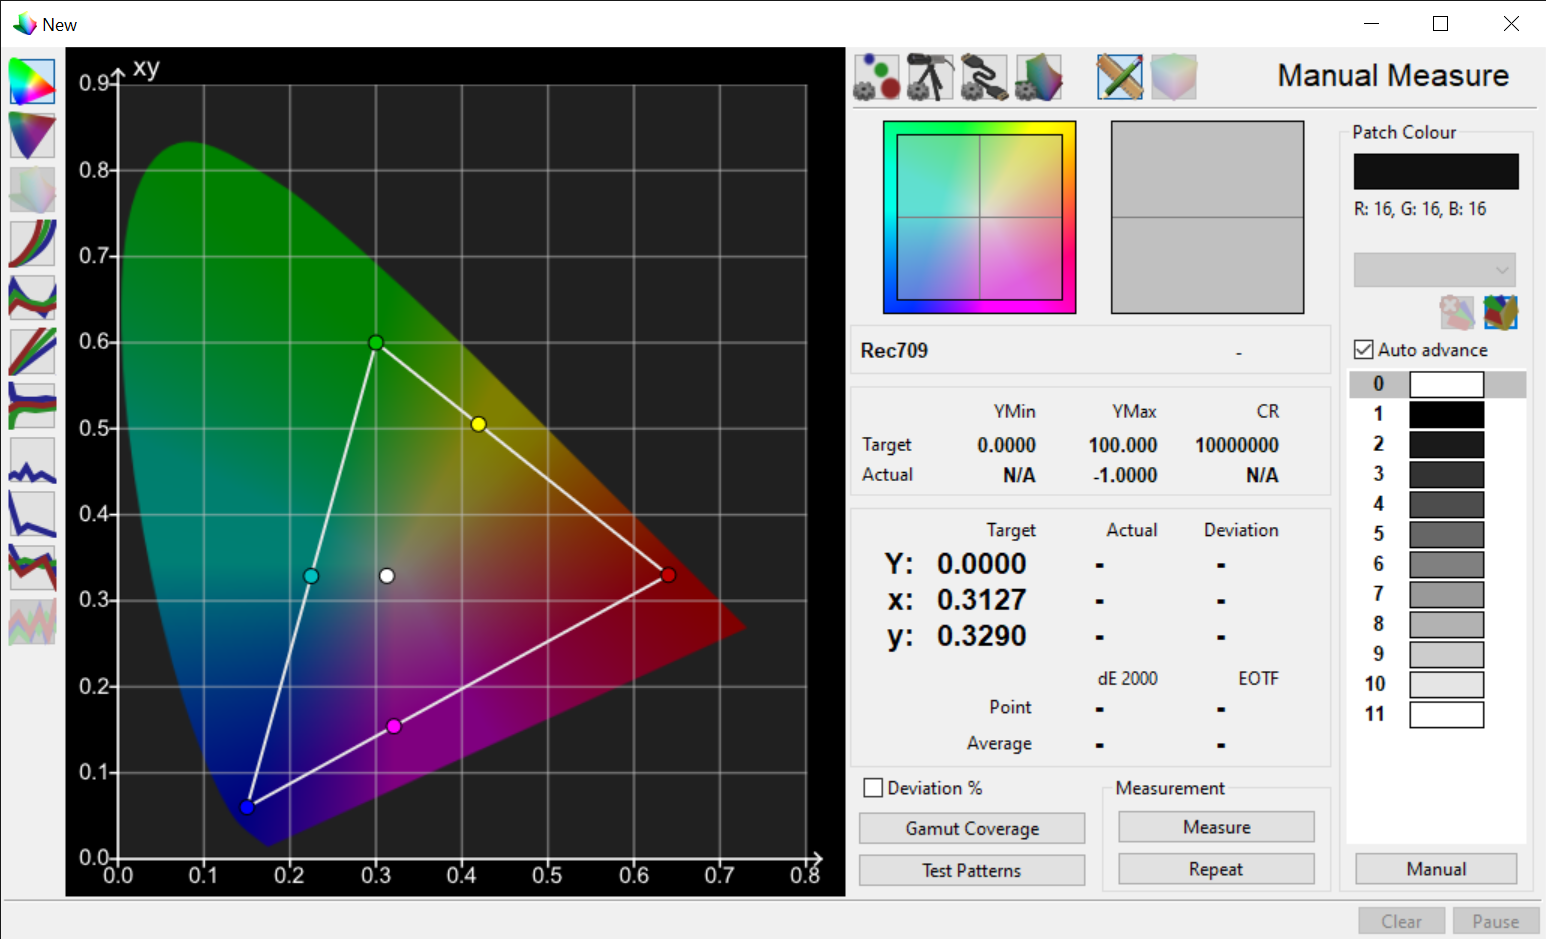
Tick Auto-Advance if you are using PGenerator, for ColourSpace to read all patches of the patchlist after clicking 'measure'.
Disable Auto-Advance when you are using Ted's Media Files / Blu-Ray, or when you use PGenerator, and you want to measure only the selected patch.
When the patchscale setting does not match the loaded patchset levels, you will see a red-ish background for the patches out of the pre-selected patchscale:

Legal patchscale needs a legal patchlist (16-235 RGB triplets).
Extended patchscale needs an extended patchlist (16-255 RGB triplets).
Probe Options 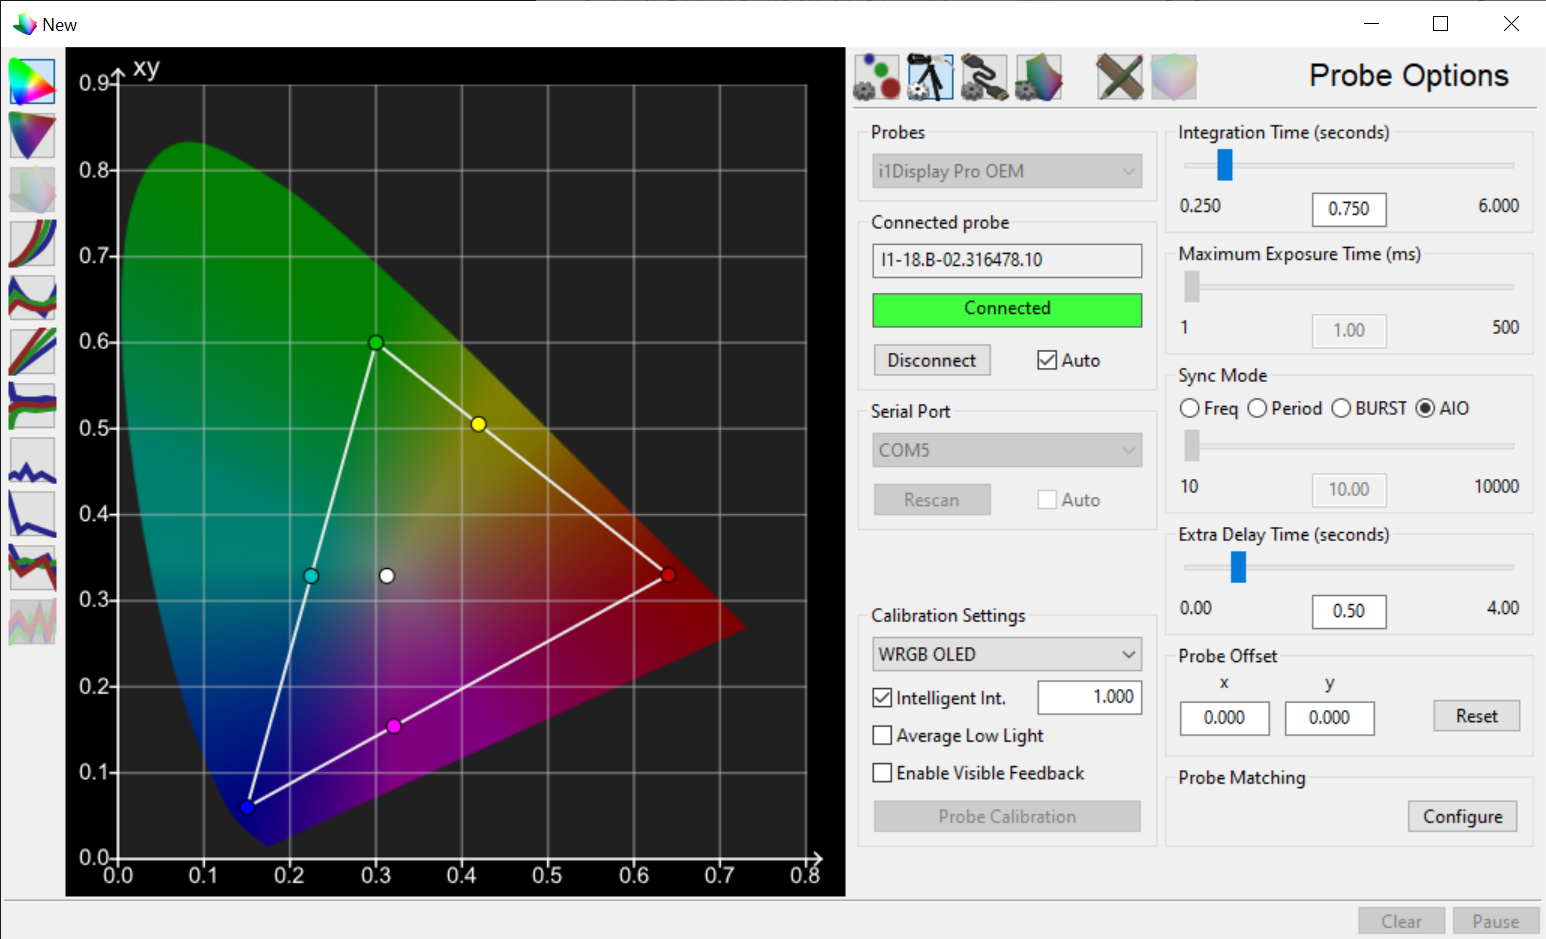
The 'Extra Delay Time' 0.5 sec is the recommended setting for PGenerator users for ColourSpace to wait 0.5 sec with the patch displayed on the screen before taking a measurement.
0.5 sec works as a safe setting to prevent network delay, temp image retention with Plasma/OLED, for the panel backlight to 'stabilize' before reading it.
For users of Ted's disk with blu-ray/media files, since they will change the patch manually, they can use 0 extra delay and just click to measure each patch after it's been displayed on their screen.
i1Display PRO-based colorimeters are available with A-02 or B-02 firmware.
You can see that detail to the connected probe area; as you can see, I have connected a B-02 FW.
B-02 FW can use AIO mode and Intelligent Integrator; it's the best option for i1Display PRO users.
For B-02 FW, the standard integration time, which provides some decent results with various panel techs, is 0.75 sec with intelligent integrator 1.
For OLED users, Integration time 0.25 sec with intelligent integrator 2, can provide a speed improvement, then you want to perform a faster 1000p verification.
However, 0.75 sec with intelligent integrator 1 is the standard recommendation for OLED users.
It will provide a good balance between speed/repeatability.
For A-02 FW or for ColorMunki/i1Display Studio users, use BURST mode 1.5 sec integration time and tick average low light.
The AIO mode with B-02 FW can reduce the measuring capability to the very low end.
Some projectors/plasmas with very deep black, when AIO mode is used, they may not be able to measure their black level.
Users of B-02, with JVC projectors, for example, can try to take the same measurements with BURST mode 1.5 sec to see if they can get a valid black level reading.
If they can get a black reading with BURST 1.5 sec integration time, then they can use this setting with intelligent integrator 1 for the remaining calibration.
If BURST mode is not able to measure black level, then use AIO mode with intelligent integrator 1.
A-02 FW is not compatible with Intelligent Integrator, so users will have to use the Average Low Light.
The Calibration Settings has a drop-down menu where the user can select a spectral correction table for a specific display tech.
For LG WRGB OLED panel-based TVs, select the WRGB OLED.
For Sony Broadcast OLED monitors, select RGB OLED.
When you have a spectrophotometer to create a meter correction table, then select the Generic CMF.
Genetic CMF will load only the meter factory calibration without any additional display-tech-specific spectral correction.
For i1PRO users, enable Average Low Light only and use the same extra delay you used for the i1Display PRO also.